New siding work in progress

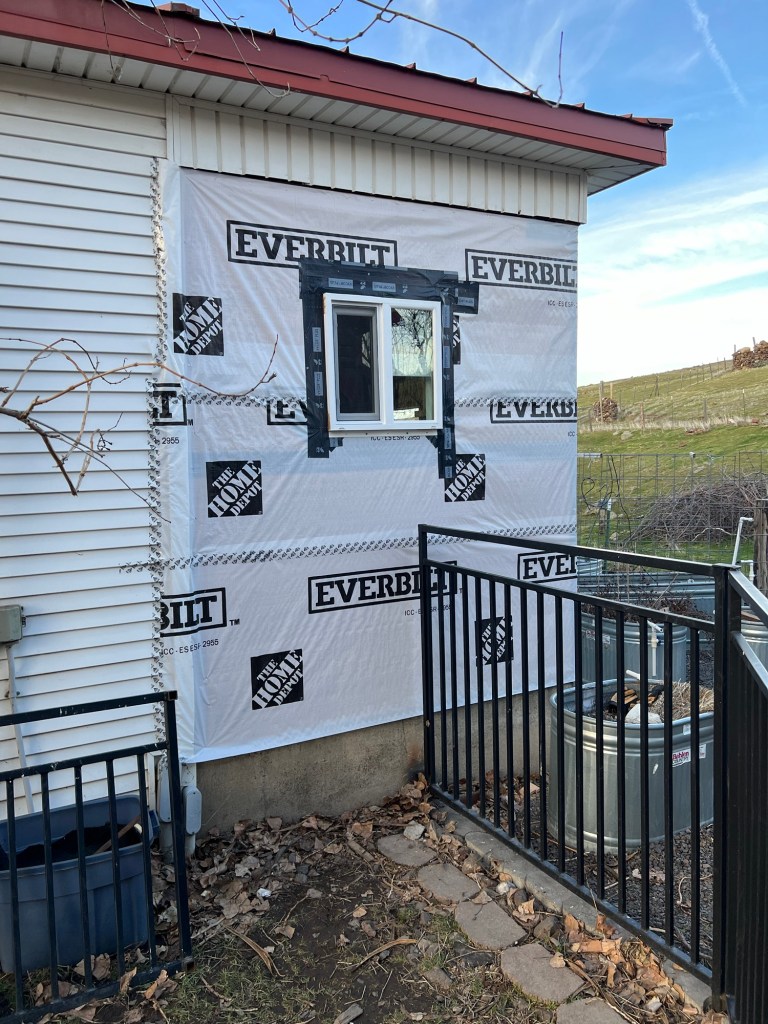
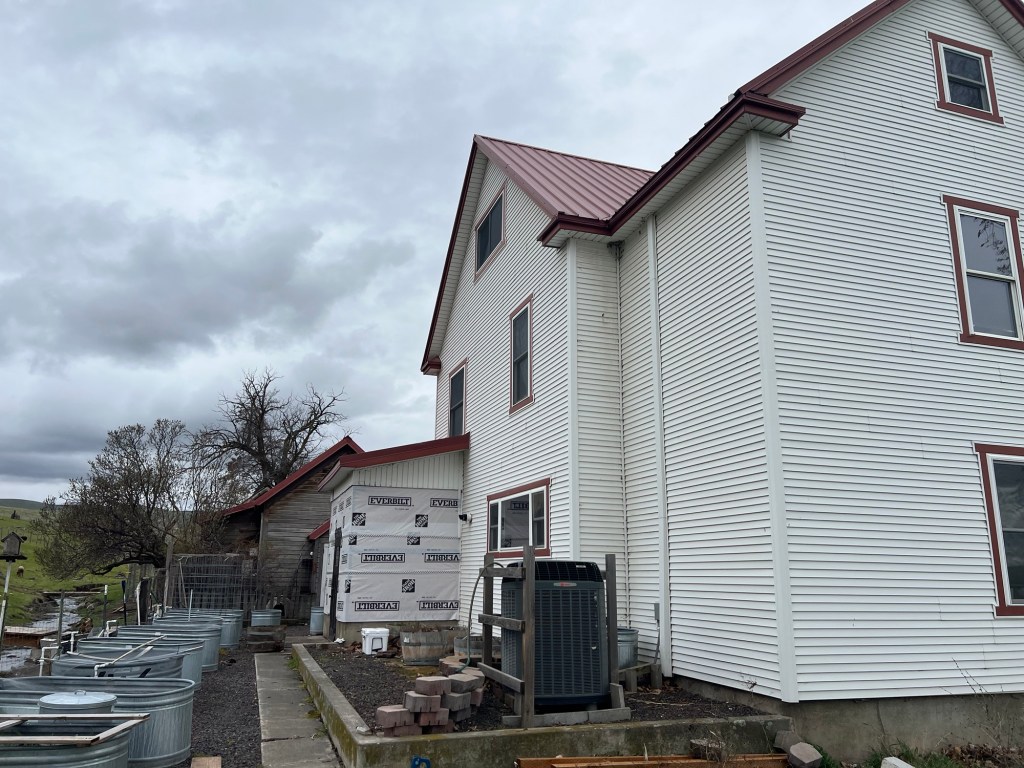
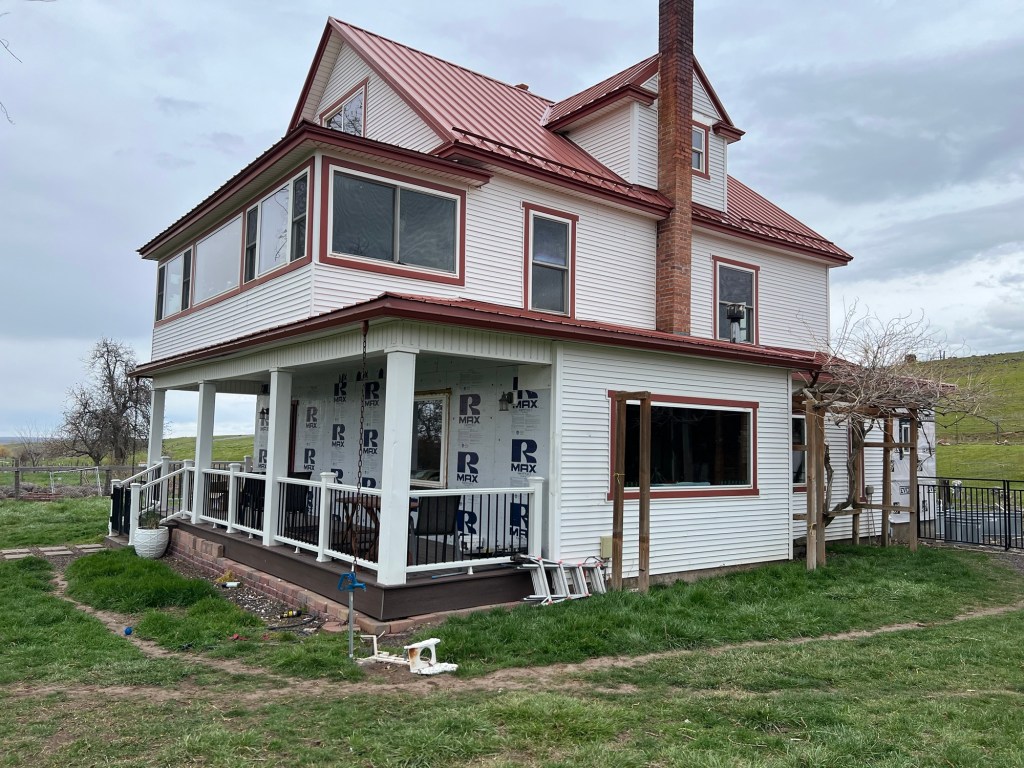
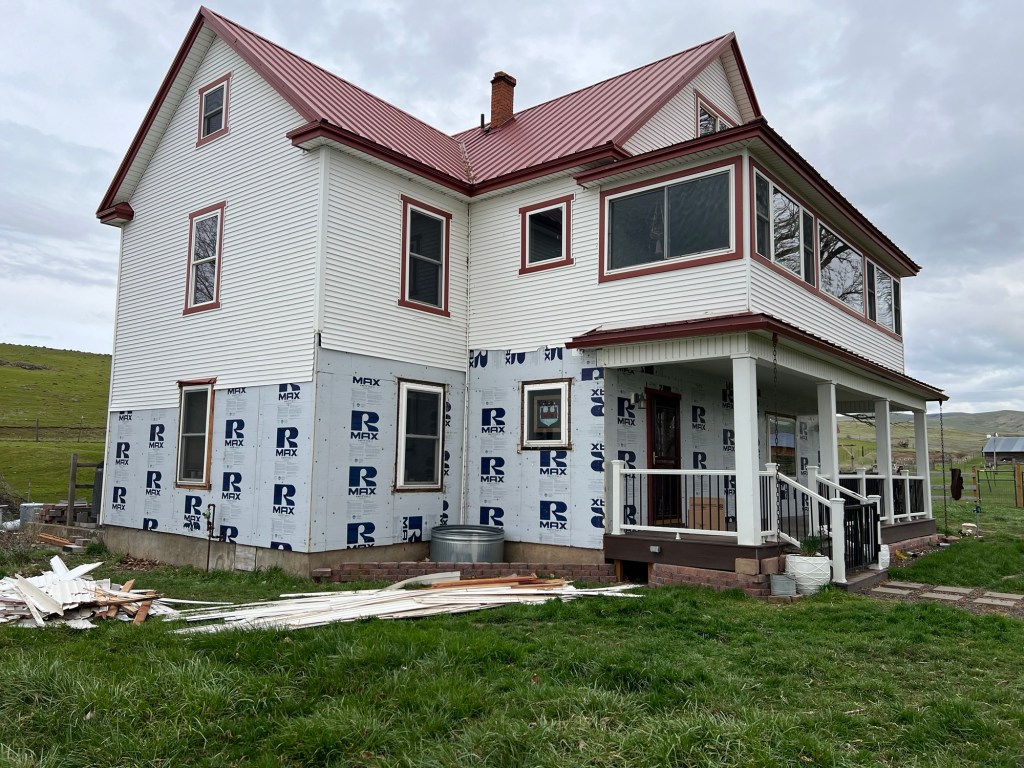
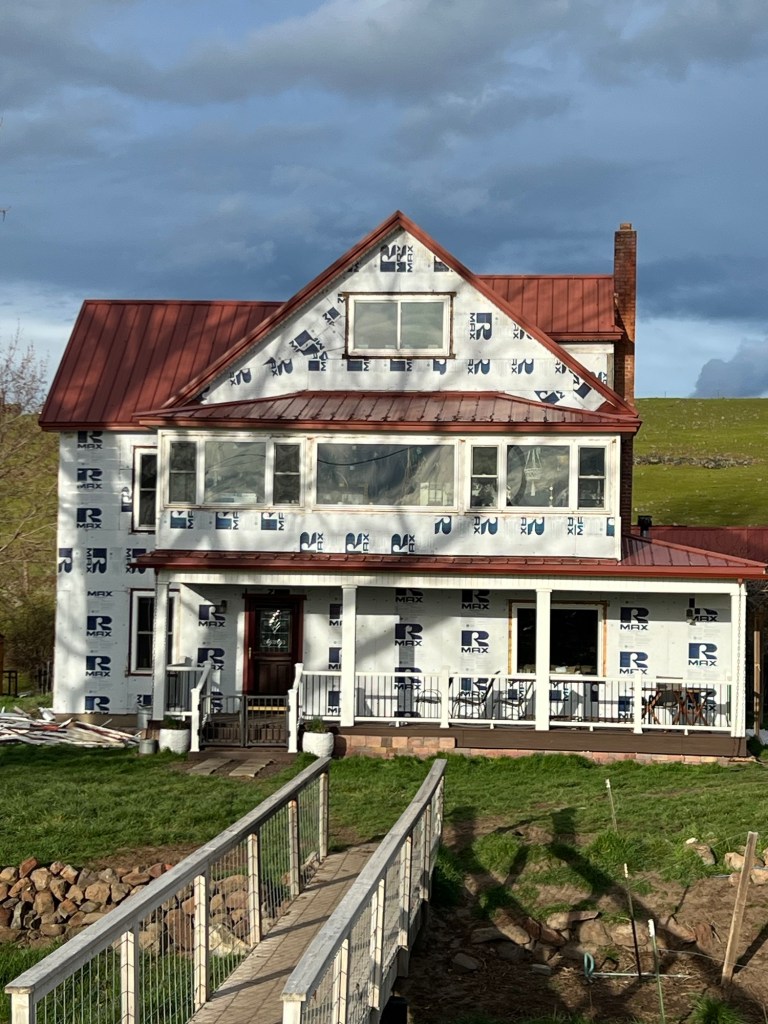
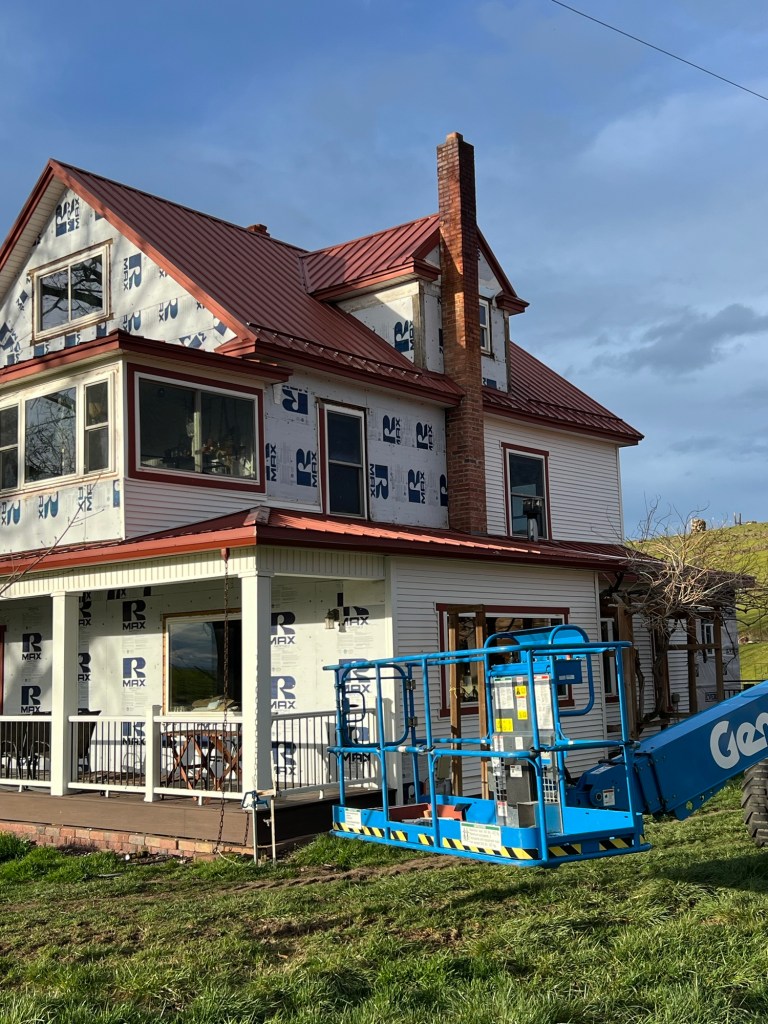
Well the contractor did their part and came out and started tearing up the house. They had the siding off in a week. The 60’ boom truck is a little rough on the yard as it sinks in as it moves and the tracks are about 4” lower than the surrounding yard. This works well for Annmarie as she wanted to redo the front yard anyways and this will just move that project up on the timeline. The nice thing is the gate can stay closed so we have not had to move the dogs. They just harass the worker to throw the ball for them. The problem with that is they never get tired and would keep that up all day long. We are installing LP SmartSide siding on the house. We need to have to not paint before we die in 30-40 years and it looks good and is durable. This will be the test. I was able to drive by a house and see it before choosing this contractor. I really liked the final product and I think it will look very good on our home. For the price I sure hope so, but anyone who has had to hire a contractor recently knows they are very expensive. My advice to you is to do your due diligence and find someone who is very reliable and does good work. Don’t skimp out, get it done right the first time. Because paying for it twice or to get it repaired will cost more than doing it right the first time.

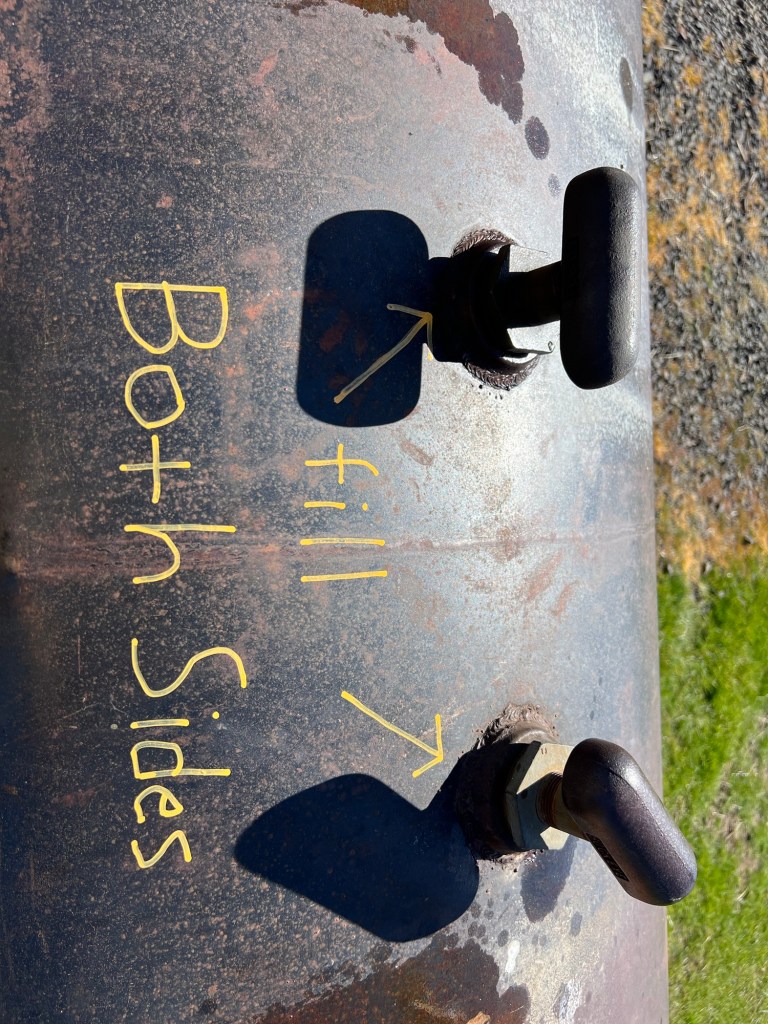
I had to call for more farm diesel and again they only filled one side of the tank. It has two 65 gallon tanks in the large tank. It came from a trap wagon so one side had diesel and the other gasoline. I only want it to hold 125 gallons of diesel. So when I sent the check for payment I asked if they would come out and fill the other side. The salespeople keep telling me that both sides should be filled by this is the second time only one side has been filled. So I bought a paint stick, cleaned off the diesel and wrote directions directly on the tank. I am pretty sure they will get it right now.

Parts for “Little Dumper” (1957 truck) keep trickling in. The $44 seat cover arrived and I got it installed. This was not easy to do considering you cannot open the driver’s side door yet. The front left fender needs to be moved forward about one inch to allow the door to open. It needs a little adjustment but it is way better than the original seating. I may still throw a horse blanket over this to keep it protected. But before I can do anything else inside the cab the driver’s side door has to be fixed. It was hard to be inside the cab and contorting myself enough to get the straps in place. The Gingerman is still working on the engine so until that is up and going the door issue is on hold. Plus, we really need the new tires on the vehicle to get it off the ground enough to be able to crawl around under the truck. I have been at the shop twice weekly to get things going but the parts are not easy to find.

Getting ready for contractor

Last weekend I had to start getting things ready for the contractor. They were going to come out and start tearing the old vinyl siding off and get ready for the new LP Smartside siding. The trouble is I needed to get some things done. I had to remove everything away from the house so ladders, boards, some TREX decking I had left over were moved away from the house. I had to take down the temporary fence on the North side of the yard. I really just rolled it up most of the way. I had never set the posts yet or added a gate as we knew any contractor would have to get over on this side with equipment.

They wanted to bring in a 60’ cherry picker and that meant getting across or through the front spring. I had created a crossing for the septic pump truck but the driver did not want to chance it and was able to reach the tank from our driveway. I had dug out the large rocks I had used for the crossing. So I tore down the temporary crooked fence I had stopping the horse and sheep from getting out of the main barn lot. I filled the crossing with 2-3” rocks and packed it all down by driving over it with the tractor. Some of the water is flowing through the rocks but mostly it is crossing a wide spot with about 2” of water. I used part of the temporary horse corral panels we had blocking the narrow creek side of the barn lot. This can only be temporary as I need those panels to block off the spring access when we run cows through the barn lot. So I may have to insert a small fence. I am thinking about just making a wire gate. We will almost never use this crossing but it is nice to have the option. I am tired of buying new metal gates at $350/each. I need about another 10 gates and am now going to be selective in which ones get a metal gate. I did find three more metal gates while I was out and about on the farm. It took me a few hours to get all of this up and in place.

I salvaged what honey I could from the hive that died in early winter and was able to collect five half pints. We had them all sold in about ten minutes. We could easily sell 5-10 gallons of honey annually we just cannot produce anywhere near that! We are looking at getting another Nuc and starting a second hive this spring.

Every once in a while I find one of these salamanders when I pick up a plank that has been on the ground for way too long! I am pretty sure we have one living down in the main water shutoff access hole. They are pretty calm. I no longer disturb them and just let them wander off on their own. We are so looking forward to getting the siding completed.

Mud room guy finished 90%

Well, Mr Rainman and I managed to knock out most of the mud room in the last two weekends. We are at the stage that I dread the most, the last ten percent. It will take an entire weekend just to get that last 10% finished. It cost about $45/sqft in materials to get the three walls, insulation, exterior door, one small window, and three types of interior lining basically just over $4k for a mud room that I installed with help. I cannot imagine building a house in this day and age from the ground up. My suggestion would be to find a house with good bones and do the work yourself.

I decided to go with smooth plywood on the short sides of the room and we just used some scrap tongue and groove to finish off the top. The back wall has all blue pine tongue and groove. I really do like the stuff but at $10/ea for a 1×6”x8’ board it doesn’t take long to add up when covering a wall. I went through about 80% of the wood pile to find 29 pieces that were worth the ten bucks. Unfortunately, the store won’t bring out more material until someone buys all the crud. I had to go to another store and ended up with white pine in two different patterns. Of course we did not realize that the pattern had changed until we were 60% done and there was only 90 minutes left of work. I just told Mr Rainman that we would be the only ones that noticed it because we had uses different patterns on all the walls so no one would be able to tell that we did not deliberately do it that way.

He talked me into doing a white wash treatment on the wood to protect it, transmit the light and let the wood grain show through. I have never done this before so I am interested to see how it turns out. I also have 60 sqft of cedar closet lining. So once I get the walls all whitewashed I am going to install cedar lining on the two plywood walls. This should help us cut down on bugs and moths. The room is on hold this week as I will need to get outside and work on pruning our fruit trees. The weather is screwy and it keeps changing, 20F-60F in Jan-Feb, it’s not normal. So I need to get fruit trees because it might be 70F in March.

We found a contractor to tear off our vinyl siding, replace three windows and install Diamond Kote siding. The siding should outlive us and the weather should not affect it as much as our vinyl siding. The siding does not have to be painted. It’s a crazy amount of money to do that, more than we paid for our first ever house 30 years ago, just for siding. The job is just too big for me to do in a summer while I am holding down a full time job and trying to work on the farm. It is not possible to do all things, some things have to be farmed out.

We are going to have to get another 16’ of ice breaker stops installed on the front roof of the house. We had a fairly large chunk of ice fall and smash into our new porch railing. It shattered one side of the TREX railing. So that is on the list to replace this summer. It’s always something, the gutters have made a huge impact across the front of the house. The ice breakers worked amazing on the side of the house this winter. Even the black plastic moisture barrier we installed under the house is making a huge difference. We have used about 50% less propane to heat the house this winter. At this rate paying for insulation to install under the floors, our investment might be realized in just one winter. If we continue to use this little propane then I want to add insulating under the house to the summer projects list along with installing the gazebo and getting the man cave closed in. Just a few things to knock out this summer along with hay and weeds and mowing.

I have to say that anyone can really learn to do most things by watching YouTube! I had a couple of install questions on the door and window with the house wrap and I was able to find the answers fairly easily. Watch one, do one, teach one!

We are going to leave the concrete floor for a while. I would like to tile it eventually but it is a mud room and we need it for that reason so the concrete is appropriate.

Bounty shelves

Sunday I was going to go out to the barn and finish the three strings of lights that have wire ran to them. I still need to wait for the fourth roll of wire I had to order to arrive. I am not sure why I thought three rolls would be sufficient. I used the pending arrival of said wire roll as the reason to not go to the barn and instead decided to work on the new shelves in the laundry room. Our counters are getting crowded with all of the containers of dried herbs, vegetables and plums so I figured it was time to get on the shelves. The supports had come in a couple of weeks ago and The Apprentice and I had brought down the wood so it was just a matter of sanding it down and cutting it to shape.

Yeah, all I had to do was sand down a black walnut slab that was only one inch thick and had been drying for four years. Needless to say it was not flat. Even with 40 grit sandpaper and an 18” belt sander it still took me almost four hours to sand down those two shelves! I really needed a hand planer. I have never really used one before but this is the perfect use for one. I may have to learn how to use it as there are a whole bunch of black walnut boards out in the old chicken coop.

I sanded both sides with belt sander and after I got to 80 grit with the belt sander I switched to an orbital sander and started with 50 grit again. Of course about three hours into the sanding it started to rain and I had to move everything into the old house and wear an N95 for the After four hours I figured it was just time to cut the board and go with what I had. I cut the shelves, added the supports and then mounted them on the walls. I, of course, had to make two trips out to the old house to get screws that did not come with the supports.

All in all it turned out pretty good and the wife was happy. We now have a space to store the bounty of our garden harvest. I still have to wire the barn but I can do that in the rain.

Annual water leak

Every year around the winter holidays we have our annual water leak. This has gone on without fail for many years, so long in fact that it is now a tradition and we have come to expect it. It is the main reason I have insulated coveralls and has been the single greatest reason I have utilized my chest waders. Well we had not had any leaks, we still have great water pressure so we don’t even suspect a leak is brewing. A slow drop in water pressure means there is a leak but it usually takes about six months to surface so we know where to dig to fix it.

Last week Annmarie had noticed a puddle of water on the tile floor in the craft room downstairs. This room shares a wall with the kitchen and in that wall is the water riser for the freezer. We also have a drain line from the upstairs heating system condensate pump and there are siding issues on that side of the house. Any of these could be the source of the leak, but there was a plastic gallon container of deionized water a mere 12” away from the puddle. I theorized that the most obvious cause was the cause and the puddle came from the gallon of deionized water. Otherwise, I could potentially have to rip the murphy bed off of the wall and move it out of the room. It is a solid day to take it down and then reinstall it. This did not sound like a good plan on a mere hunch that the leak might be behind the murphy bed. We dried up the puddle and there was no water puddle the next morning, problem solved! There was still the issue that when I took the offending gallon to the sink and rolled it around and pressed on it, I could not seem to make it leak…

Move forward to Monday December 20, 2021, the wife calls me at work and states that there is now a huge puddle of water in the middle of the craft room floor. She is unsure where it is coming from but there is a definite leak. My biggest fear at this point is that it is the house siding as it had been raining with a solid wind behind it. I told her I would look at it when I got home.

When I got home the first thing I did was go to the offending room and look for a leak. Luckily for me it was fairly obvious that it was coming in through the ceiling. The paint was forming a bubble and the sheetrock tape was starting to swell.

I went out to the old house and brought in a big roll of plastic and draped all three big items in the room then cut open the ceiling. I had to tear out about a four foot hole to see where the leak was coming from and the sheetrock was wasted, too water logged to allow to dry out and reuse. Once I had a large enough hole I could see that it was not the condensate drain line. I would have put money on that being the cause of the leak. I went back upstairs into the closet where the sump pump was located and realized that the rubber drain hose had been knocked out of the drain hole and was draining out onto the floor and down onto the ceiling below. This must have happened this summer when they worked on the heating/cooling system. It had a refrigerant leak that they fixed, someone’s foot must have slid the pump 1.5” away, knocking the drain hose out of place. We never noticed. So I moved the black rubber drain hose so it was pinned in place better and cut two boards to go behind the sump pump so no one could accidentally move it with their foot. I set up a portable heater in the room and we have been drying out the sheetrock ever since.

I am hopeful we can get the ceiling repaired in the next couple of weeks. Meanwhile we have been feeding the quail. We really want the population to boom this next spring so we are trying to keep their numbers up this winter. The rock pile in the top right hand corner of the picture hides a 25# quail food block that they graze on when they make their daily rounds. The rocks keep the block from the view of our chickens, therefore the chickens don’t know there is an abundance of food within walking distance! The quail came by last night and I was able to count 94 quail in one covey. We are pretty sure there is a second large covey on the upper end of the property. They don’t get fed but we figure if we go into spring with 100 we should come out this next fall with a few hundred.