It’s all fun and games till you have to work on the exhaust fan.


Lead ewe with her twins.  Best color of the year.

I ran out of excuses to not work on the kitchen down draft fan.  Annmarie had suspected I was putting it off but I kept coming up with something else that needed to be done.  I ran out of “other things” to do, so today was day one of the vent fan fiasco.  Now, one might think I was sarcastic by this comment but you need to read more of the blog to understand what my true normal is usually like.  I unpacked the fan and found the fan body bent and the decorative top strip bent.  The fan body was not a big deal, I bent it back into place.  The chrome strip that goes on top of the raised fan had a peg bent and it needed to be replaced or it would not stay in place.  I called the Whirlpool help line.  I was told that the fan I had purchased was made in 2012 and was outside the manufacturer warranty.  I then led with the information that I had just purchased the fan from Fred’s appliance last month.  They then countered with wanting to know if I had contacted Fred’s to get the part.  I said no, I called them. We then found the part I needed and the helpful person, on the phone, said he would list the part in my file but they needed proof of purchase with a recent date before the part could be sent out.  I of course had thrown that away.  I had to call Fred’s and get someone to email me the receipt so I could in turn email it to Whirlpool who may have it on file in two days.  I just need to check back then and if everything is in order they will send me the part.  This only took 1.5 hours. 

fan insert raised, backwards!

After swapping blower motor, lift assembly does not move. 

I then put the fan together and turned the blower motor so it vented to the rear.  I was ready to rock as soon as I had some power.  I dug around in the old house and found a metal conduit ring, now if I only had some wire and a plug.  I wanted a flush plug so I went to the local hardware store and found a 90 degree extension cord and cut off the female end.  I wired the fan and figured out how to mount the legs and what was needed to mount it to the wall.  I scooted it in place and it fit!  A whole 1/4 inch to spare.  I plugged it in and it worked!  The fan extended (see picture to the right) and I was able to adjust the speed of the blower.  All was good with the world, or so I thought.

 I looked at both sides of the fan when extended and noticed that the side closest to the stove was just a piece of smooth stainless steel, but the other side was a couple of metal screens and the place where the air was actually getting sucked down.  This is not good, it is wrong.  Having done a very unguylike thing, I had read the instruction manual several times. I didn’t want to screw it up.  There was a way to swap the blower motor to the other side!  I was saved.  I had to remove the blower motor and swap the wiring internally and take off the covers.  But, alas it was not that simple.  There is a lifting mechanism and it cannot be moved.  I continued to swap over all the pieces so I can get the fan opening on the right side near the stove.  Well this makes my fan 4 inches too wide for my opening.  This means I will have to cut into the cabinet to get it to fit and cut out through cabinet wall to vent it outside.  This is still doable, but now I have to build a wooden top with the fan in the center.  Again, this is possible but it is starting to get more complicated.  This puts the raise and lower button next to the window.  You need to reach over 30 inches to raise and lower the fan.  The fan speed switch is a diagonal switch that you physically move up and down.  It would be at the far end of the fan near the window.  You would have to feel it while stretching out to adjust the fan speed. 

So I did some brainstorming, We could go buy a stovetop only and I could build a custom cabinet next to the sink that would hold the fan and stovetop.  This is what this fan is really designed to accommodate.  I had to do some more research.  We would then not have an oven.  So the heating guys are coming tomorrow to install our new downstairs propane freestanding heater in the dining room/living room.  I could ask for a quote to install propane in the kitchen where the sideboard is now.  We could move the stove/oven there and just not fry anything and just use the oven.  Eventually, I could build a custom cabinet and put in a single or double oven in that wall.  I realize that this is not spending less money to solve the problem but it is a solution and one which I came up all on my own.  I will have to consult the boss tonight when she gets home, but truly I am not sure how we are going to tackle this problem. 
Counters done.

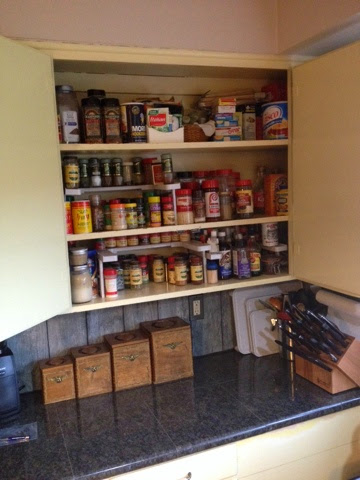
Spice cabinet organized.

I am moving on to the next project.  The kitchen countertops are 100% done.  I installed the outlet covers yesterday and managed to not electrocute myself again.  I touched a hot wire two days ago inserting spacers to get the outlet the correct distance from the box.  It hurt, a lot!  I even cleaned up the spice area, took everything down and washed the cupboard.  I threw out the duplicates and nearly empty spice jars and installed some plastic shelves in an attempt to make everything more visible.  It looks a lot better and I was surprised at how many spices had spilled inside the cupboard.  There was some green colored goo on two shelves.  I have no idea where it originated.  I had to scrape it off with a knife.
We cleaned everything as we put it back on the shelves.  The only thing left is the downdraft fan custom cabinet and install.  Annmarie says I am stalling because it is going to be difficult. My reason is I am trying to catch up on all the stuff I had put off while doing the countertops and backsplash.  I just finished our annual financial summary for the farm.  We need that to do our taxes.  I just need to print out the mileage for the pickup and my part of the taxes will be complete.  Annmarie does the hard part and I don’t want to be the holdup.  In reality I don’t mind the cabinet portion of the downdraft fan, I just don’t want to cut the hole through our outside wall.  I cannot be off even a little bit or bad things are going to happen.   I really do need to do these other things and am only procrastinating a little.  It looks like next week it is going to happen. 

Left kitchen countertop

Right kitchen countertop.

2014 annual summary

2014 Annual Farm Summary.


INCOME:
 We sold $2260 worth of sheep (around 65 animals) and $762 worth of eggs.   Our egg income was way up due to more pullets and buying feed in large quantities when I found it on sale.  

EXPENSES: 
I have several categories so I will give a brief overview of each one and then my rounded expenses.  I am not going to add them all up so the numbers may not add up to my real total but it will be close enough for record keeping purposes.  There is no other neat way to do this.  It worked last year so I am going to stick with it.  I will add a little more description to the categories in hopes that it will make my life easier next year when I go to add the totals up and figure out which category they go in. 
  
ANIMALS: This covers the baby chickens, medicine for the sheep and chickens, bedding, straw, salt and supplements.  $260
FEED:  This covers all the chicken food, sheep grain and hay. We purchased 2.5 ton of hay last winter for $500 and bought 1 ton this summer(hay $605)(animals $990, chickens $390). $1380
GENERAL:  This covers the fencing supplies, gloves, safety gear, nails, clips, hardware for gates, locks for gates, hinges (labor $ 1475). $4082
EQUIPMENT:  This covers pickup repair and upkeep, trailer upkeep, and a new sheep sorting chute system($2791)  $3532
VET:  This covers Zeke only and his tick medicine.  $118
TRACTOR/SPRAYER:  This covers the tractor maintenance and fuel, quick hitch for tractor, mule fuel and sprayer repair and upkeep and herbicide (tractor fuel  60 gallons $237, spray $0).  $910
BUSINESS EXPENSE:  This is for a license renewal, farm insurance we are required to keep now due to number of animals and buildings.  $1901
BARN IMPROVEMENTS:  This is for repairing the barn.  We finished the tin roofing, added the second cupola, I changed the orientation of the milking addition door and started working on the overhead walkway inside in the animal area.  I added a window to one of the hay rooms.  It is a frosted bathroom window, it lets in lots of light but no focused light so fire is not a problem in the hay areas. (labor cost of $1100)  Total  $2014
Expense total:  $14,197 for the entire year.

GRAND TOTAL:  A loss of $11,175

That is a pretty accurate number as I was very good about keeping receipts again this  year for everything.  I may be off a couple of hundred dollars for lost receipts but overall I keep a good filing system and try to get my receipts corralled before they get lost. Our major expenses are starting to dwindle.  I do need to purchase a couple units of lumber this year and we need to buy posts and gates for the cow sorting chute system but every year we are getting closer to self sustaining.  2014 was the most money we have made off the farm since we moved.  In five years, I see our expenses dropping to around $4000/yr and our income jumping to around $8000/yr.  Who knows, maybe the price of eggs will be so high we put in another 125 pullets in the old chicken coop, some solar power to open and close a chicken door and collect  7-10 dozen eggs/day for sale.  Time will tell.  The old chicken coop would only require a little work and it is almost empty, just a little lumber stored and a little junk to sort.   There are always options. 

We had to cull one ram due to his rubberband castration not working. Now everyone gets TWO rubberbands to prevent this complication.  A coworker came and took him home to the freezer.  We did not eat any last year for personal consumption.  Depending on how this year goes we may still have some in the freezer this fall.    We are now feeding six cows and will be getting three more babies in April.  At that time, we will turn the bull in with our two yearling heifers.  We would like to get to 10 heifers.  The cows eat more than I am calculating so we will have to buy hay to get through the winter. We butchered three cows, ate two for family and sold one for $2.50/lb hanging weight.  Their carcass weights were 330#, 342# and 335#.  I got the barn roof done!  This was a huge undertaking and I am glad it is over.  I have one leak on the backside I will crawl up on the roof and investigate after spring and before it is 100 degrees outside. 

 I want to do some more work on the platform in the barn and pull out four of the jugs.  That will leave us with two jugs that I will raise the sides another two feet so no matter how wild the mother there will be no jumping out!  This will let me put feeders on the wall where the jugs used to be.  This will be needed as we want to jump the sheep up to at least 50 ewes. 
 Fencing has again become a priority.  It never changes. I want to subdivide the lower pasture next to the back creek.  I want to replant that 2-3 acre field in Sainfoin.  I would like to see how it will grow and it will only cost about $200 for seed.  I need to run a fence up the back hillside to add more grazing ground and I would like to divide the back hillside at the apple tree up the hill also.  This would allow me to run the bull and cows in the lower pasture and still have to two fences between him and any young heifers.  He is a pain in the butt when it comes to finding ways to get to the heifers! This year we want to redo the cow sorting chute system, narrowing the chute and adding two more sorting areas with 8 more gates.  It will be a lot nicer.  We also want to put a fence across the front hillside by the cars so the cows won’t come down the hillside to the creek.  This will also let us tear out the front chain link fence.   I will have to do some work on the irrigation pump and retracting sprinkler. Those are the big projects for 2015.

Not a pullet.

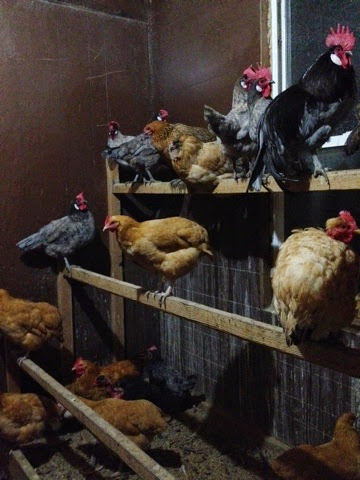
Chicken coop

Yes, chickens really are dirty.  They are the dustiest creatures known to man.  My perch needs to be about two inches farther out from the wall to prevent the poop paintings.  Unfortunately, I don’t have the room for that as I would have to move every perch two inches forward.  I am thinking about adding another high perch directly over the lowest perch.  Almost no one uses the low perch and with a second high perch I think its use would vanish.  The chickens want to be the tallest person in the room. 

I seem to have stopped whatever virus/disease was present in my coop with some timely vector elimination practices.  Not a sick chicken to be had in the last week.  I am going to have to cull another rooster.  My babies from this fall should start laying in March and I just noticed this week that my “pullets” are not all girls!  One of them is a boy, he is starting to grow a larger comb and develop darker neck feathers and some longer tail feathers.  We are going to let him live and kill off the old rooster.  The rooster will help integrate the flock and having a new rooster will make the old guard more prone to integrate.  They won’t be so insular, at least that is the theory I am going to postulate.  Time will tell if I was right.  The egg yolks are starting to get a little more orange in color.  The chickens are starting to roam about more during the day. 

Today I used a metal rake to finish getting the mud in the barn lot out of the front creek and spread out more pasture grass seeds along both banks of the creek.  I am hoping the grass will grow and help stabilize the bank.  I would love to plant the bottoms in new grass seed but I am going to wait until after March.  I don’t want a freeze killing my new plants.  A little area like the creek bank is easily replanted.  I have 300# of chicken food left out in the coop.  Just enough to get through the winter.  I need to start watching out for the sales again.  I think I will buy it in 1000# increments.  It certainly makes it easier and really cuts down my feed costs. 

We had another set of twin lambs on Friday.  On Sunday, I decided that the momma needed a companion.   They just do better with a companion.  I decided that our old lead ewe #1 is pretty pregnant and the friendliest of the bunch so she should be easy to wrangle into the baby area.  Yes she is friendly, but she is also a Dorper so she is our largest sheep.  She did not want to go in the baby area despite the food quantity being endless.  I ended up having to catch her and straddle her body and neck and drag her forward with my legs and arms while straddling her.  Not the most gracious movement.  We were almost to the pen gate when she decided to bolt for the open door out into the barn lot.  I had to catch her by the neck at the last minute, I finally got the pen gate open and the dog stopping her from rejoining the main herd caused her to go into the pen.  The worst part was it had been raining all day long and her wool was saturated with water.  My jeans were soaking wet!  They have been doing fine and today I noticed her udder filling up with milk so hopefully she will have her babies in the next few days, or she is feeding the other ewe’s babies. 

Kitchen coming along nicely.

I am making real progress on the kitchen.  This is a good thing, as even I am getting tired of cooking and cleaning in the laundry room.  The backsplash countertop seam was caulked today.  I will need to clean it up a little once it is dry.  I am not the worlds best caulker.  I tore the faucet out of the old sink and spent a couple hours cleaning it all up and got it reinstalled into the new sink.  Found a solid stainless steel drain for the new sink.  I thought I was going to have to get a bronze plated with stainless steel.  I had forgotten that those have to be put in with plumbers putty so now I have a little container of that.  I used 100% silicone around the sink and then set it in place.  The fancy 3 inch stainless steel sink attachment screws I ordered at $6/each made it possible to set the sink.  I broke two of them tightening them down.  The sink was a little bent and had a 1/32 gap at one corner so I ended up running silicone all around the outside of the sink.  I am going to let it dry and then cut all the excess off with a razor blade.  That is the one thing nice about working with polished stone tiles.  You can treat it like glass and it cleans up very nicely with a razor blade.  I even hooked up the sink to water and the drain on the FIRST time with no leaks!  Truly amazing for me, I always have to redo any plumbing at least twice. 

Tomorrow, I will clean up the caulking and put in my spacers for all the wall outlets.  Once the new outlet covers show up next week it will be five minutes to screw them in place.  I need to reposition the fridge and then it is onto the downdraft fan.  I cannot install the window trim until the tile is installed behind the stove.  This will be the final item I do in this kitchen project. Tile cannot happen until the downdraft fan is in place and hole through the wall is cut and ductwork installed.  I want to be able to tile around the duct so I can insulate and get a good fit with the tile.  I brought the fan in from the car a couple of days ago.  It was very awkward, it is a rectangle 4x4x2 feet and weighs around 80 pounds.  I made it to the front porch and had to have Annmarie help me get it through the front door when she came home.  Once inside, I could get it into the library.  I have built the custom cabinet about 25 times in my head already so I think I am ready for the real thing now.  That is next weeks project.  I still have to find the appropriate vent to tie into the siding.  We found our new cabinet and drawer pulls today on a restoration company website.  We are going to get a colored glass pull and knob.  I will pick up paint for the ceiling and walls after I do the down draft fan.  Annmarie came up with a great idea to take all our old farm pictures and transfer them to wood and we will put them up on our dormer in the kitchen.  We should be able to get at least 25 pictures mounted.  It will look great. 

I had a chicken die two days ago.  A coworker, Michelle, came out with her husband and baby to see the chicken coop.  They are thinking about building one and wanted to see the layout and get some suggestions.  We went into the coop and there laid a dead Turken chicken and a Buff Orpington was kinda slouched over.  I tried to put the Buff Orpington on the perch but it was so weak it just kept trying to fall off.  I didn’t even think about anyone else being in the coop with me and just wrung the chickens neck.  In hindsight, a little warning to the witnesses might have been a good thing.  I gave my lecture on isolation cages (I don’t have one) and disease control.  I stop my diseases by eliminating the vectors.  I disposed of the carcasses and we went back into the house to talk more chickens. I have not had a sick chicken in the last two days.